ShopDreamUp AI ArtDreamUp
Deviation Actions


Suggested Deviants


Suggested Collections


Description
***DOWNLOAD FOR FULL-SIZE***
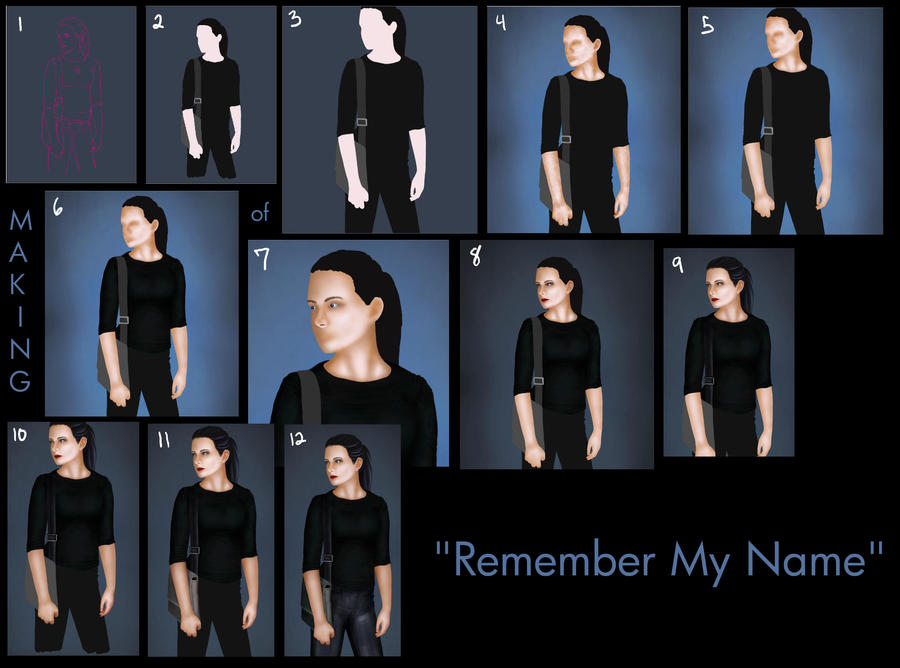
Intermediate level...requires a basic knowledge of the tools in Photoshop to follow the steps. Painted in Photoshop 6 using a 4x6 Wacom Bamboo Fun tablet.
Not really a tutorial exactly...more of a collection of WIP shots with an explanation of each step. Large file size - be warned. Steps correspond with the numbers written on each picture.
1. Sketch. I filled the background with a color that will be close to my final background and then sketched in the girl. I usually sketch in magenta/hot pink because it helps me see better. I used the grid method on this one because I'm not so great a drawing humans. For painting, you can lower the opacity of the sketch layer to use as a guide.
2. Flats. I used a hard, round, 100% opacity brush with no tablet variables in order to lay down some basic flat colors - using the sketch as a guide. I used the dropper tool to select a medium skin color from the ref photo.
3. Cleaning. I cleaned up the ragged flat colors. I hate this step because it requires a lot of patience. Sort of like sculpting - you build up areas that have dips in the contour and erase areas that have "lumps." Basically, you're just smoothing things out in this step.
4. Added a background and blocked in some basic shading on the skin using a hard, round, 50% opacity with pressure sensitivity turned on. It's messy and ugly right now, but that's okay.
5. Gaussin blur! Heck yes. Fiddle with the amount of blur until you have a nice smooth base for your skin. Don't worry about details yet.
6. Shaded the shirt. I locked the transparent pixels of the shirt layer and then shaded with a hard, round brush at about 50% opacity with pressure sensitivity turned on. No real secret to this...shade where there are dips, highlight where there are bulges. If things look wonky right now, that's because my light source is coming from the bottom right.
7. Facial features! My favorite part. It's time consuming though, so be prepared and use lots of layers. I found it extremely helpful to put the nose on it's very own layer and smooth the hard edges using a layer mask. Eyes are fun...I seem to have difficulty with them though.
8. The face is done. I used an airbrush to get the smoothness of the skin. Just about every part of the face has it's own layer: eyes, ear, lips, eyebrows, components of the eye, and nose. And I changed the background to better fit the color dark color scheme.
9. Hair! Black hair reflects the colors of the environment...sooo, since my light source is sort of bluish, I used shades of blue to highlight her hair. When painting hair, I use a hard, round brush at about 50% opacity with pressure sensitivity set for opacity AND size. I also added an earring. (Smile)") And I shaded the strap of the bag using the same method described above. Applied a built-in texture to the strap and set it to multiply, very low opacity.
And I shaded the strap of the bag using the same method described above. Applied a built-in texture to the strap and set it to multiply, very low opacity.
10. Detailed the hands. I hate painting hands, but I'm pretty pleased with how these turned out. As with all human body parts, I relied heavily on my reference photo to show me where the shadows needed to go.
11. Shaded the bag. Used the same shading method as listed earlier.
12. Didn't like the way the bag looked in comparison with the other colors, so I tweaked the brightness and changed the colors using the color balance sliders. I also added a little more shading to her arms and painted the jeans...which were actually blue to start with. It looked wrong, so I changed the color using the sliders again.
And that's it! Essentially, Violet is finished! Yay! But I still needed to add some personal details. At this point I swapped programs and moved into Photoshop Elements 5 so I could take advantage of the different blending modes to paint the lighting around her hands and arms.
Credits:
Approx 21 hours.
Ref photo by ~kristyvictoria
For more assistance, please refer to the wonderful tutorials by ~CrypticButterfly. They helped me greatly.
Character and all images © Rebecca Wright.
If this walkthrough is helpful, please let me know and I'll be happy to make more of them. If you have any questions, please refer to the tutorials linked above. If you still have questions, note me and I'll try to help.
Intermediate level...requires a basic knowledge of the tools in Photoshop to follow the steps. Painted in Photoshop 6 using a 4x6 Wacom Bamboo Fun tablet.
Not really a tutorial exactly...more of a collection of WIP shots with an explanation of each step. Large file size - be warned. Steps correspond with the numbers written on each picture.
1. Sketch. I filled the background with a color that will be close to my final background and then sketched in the girl. I usually sketch in magenta/hot pink because it helps me see better. I used the grid method on this one because I'm not so great a drawing humans.
2. Flats. I used a hard, round, 100% opacity brush with no tablet variables in order to lay down some basic flat colors - using the sketch as a guide. I used the dropper tool to select a medium skin color from the ref photo.
3. Cleaning. I cleaned up the ragged flat colors. I hate this step because it requires a lot of patience. Sort of like sculpting - you build up areas that have dips in the contour and erase areas that have "lumps." Basically, you're just smoothing things out in this step.
4. Added a background and blocked in some basic shading on the skin using a hard, round, 50% opacity with pressure sensitivity turned on. It's messy and ugly right now, but that's okay.
5. Gaussin blur! Heck yes. Fiddle with the amount of blur until you have a nice smooth base for your skin. Don't worry about details yet.
6. Shaded the shirt. I locked the transparent pixels of the shirt layer and then shaded with a hard, round brush at about 50% opacity with pressure sensitivity turned on. No real secret to this...shade where there are dips, highlight where there are bulges. If things look wonky right now, that's because my light source is coming from the bottom right.
7. Facial features! My favorite part. It's time consuming though, so be prepared and use lots of layers. I found it extremely helpful to put the nose on it's very own layer and smooth the hard edges using a layer mask. Eyes are fun...I seem to have difficulty with them though.
8. The face is done. I used an airbrush to get the smoothness of the skin. Just about every part of the face has it's own layer: eyes, ear, lips, eyebrows, components of the eye, and nose. And I changed the background to better fit the color dark color scheme.
9. Hair! Black hair reflects the colors of the environment...sooo, since my light source is sort of bluish, I used shades of blue to highlight her hair. When painting hair, I use a hard, round brush at about 50% opacity with pressure sensitivity set for opacity AND size. I also added an earring.
10. Detailed the hands. I hate painting hands, but I'm pretty pleased with how these turned out. As with all human body parts, I relied heavily on my reference photo to show me where the shadows needed to go.
11. Shaded the bag. Used the same shading method as listed earlier.
12. Didn't like the way the bag looked in comparison with the other colors, so I tweaked the brightness and changed the colors using the color balance sliders. I also added a little more shading to her arms and painted the jeans...which were actually blue to start with. It looked wrong, so I changed the color using the sliders again.
And that's it! Essentially, Violet is finished! Yay! But I still needed to add some personal details. At this point I swapped programs and moved into Photoshop Elements 5 so I could take advantage of the different blending modes to paint the lighting around her hands and arms.
Credits:
Approx 21 hours.
Ref photo by ~kristyvictoria
For more assistance, please refer to the wonderful tutorials by ~CrypticButterfly. They helped me greatly.
Character and all images © Rebecca Wright.
If this walkthrough is helpful, please let me know and I'll be happy to make more of them. If you have any questions, please refer to the tutorials linked above. If you still have questions, note me and I'll try to help.
Image size
2406x1785px 1.16 MB
© 2009 - 2024 RebeccaStapp
Comments0
Join the community to add your comment. Already a deviant? Log In